This guide explains how to configure and manage Accrual Plans in the Time Off module of edgerp. Accrual plans allow you to automatically allocate leave to employees over time based on specific rules — such as monthly or yearly accumulation. This helps streamline leave management and ensures leave balances are always up to date.
How to Create a New Accrual Plan in edgerp
Step 1 : To access accrual plans, navigate to
Time Off → Configuration → Accrual Plans
Once inside, you can view, create, and manage all existing accrual rules, and assign them to appropriate time off types or employee contracts.
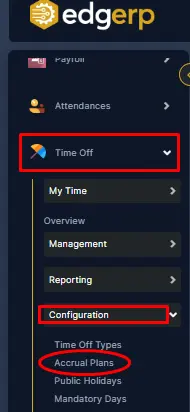
Step 2: Selecting the Accrual Plans section
Once the "Accrual Plans" option is selected from the left-side navigation menu under the "Configuration" section in edgerp the central panel displays a list of existing accrual plans configured in the system.
On the top-right corner, there is a button labeled "New", which is commonly referred to as the "Create" button in enterprise applications like EdgeRP. This button is used to initiate the process of adding a new accrual plan.

Step 3: Creating a New Accrual Plan in EdgeRP
After clicking the "New" button on the Accrual Plans page, the system navigates the user to a form view designed to create a new leave accrual plan.
This form includes several important fields and options that allow the HR/Admin to define the plan’s structure and rules:
🔹 Key Fields and Options Displayed:
Name:
This is the title or label for the accrual plan (e.g., 1.5 leaves per month).
It helps in identifying the plan for assignment to employees or departments.
Based on Worked Time (Checkbox):
If enabled, the accrual calculation will depend on the actual time worked by the employee.
Accrued Gain Time:
Provides two options:
At the start of the accrual period
At the end of the accrual period
This setting defines when the leave balance will be credited.
Carry-Over Time:
Offers three choices:
At the start of the year
At the allocation date
Other
Determines how unused leaves are carried forward.
Rules Section:
Initially empty, this section allows the user to add specific rules or conditions (called milestones) for the accrual plan by clicking on “New Milestone.”

Step 4: Defining Leave Accrual Rules via Milestone
Once the main accrual plan details are filled out, you can set up specific rules by clicking the "New Milestone" button located under the Rules section at the bottom.
Clicking this button opens a popup window titled "Create Milestone", where detailed leave accrual configurations can be set. This form allows the admin to define how and when leaves are earned and carried over for employees.
🔹 Fields in the "Create Milestone" Form:
Employee Accrue:
Specifies how much leave an employee earns.
For example: 1.500000 Days.
Daily (Checkbox):
If selected, accrual is calculated on a daily basis rather than monthly or yearly.
Cap Accrued Time:
Sets the maximum limit on how much leave can be accrued.
Example: 100.00 Days or Hours (can be toggled).
Milestone Reached:
Defines when the milestone rule becomes active.
For example: 1 Day after allocation start date.
Carry Over:
Determines what happens to unused leave after the milestone is reached:
None: Accrued leave resets to 0.
All accrued time carried over.
Carry over with a maximum limit.
🔘 Action Buttons at the Bottom:
Save & Close – Saves the milestone and closes the popup.
Save & New – Saves the current milestone and opens a fresh form to add another.
Discard – Cancels the changes and closes the popup.

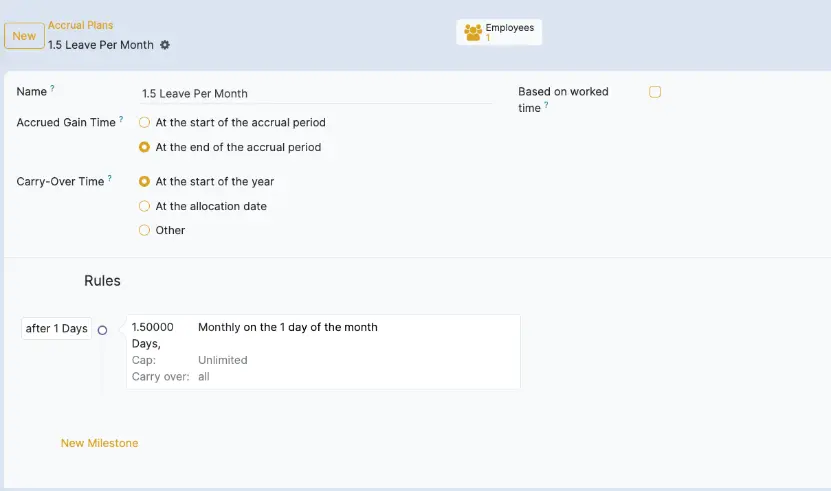
Step 5: Review the Accrual Rule
Once you click on “Save & Close” in the milestone popup:
You will return to the Accrual Plan form.
Under the “Rules” section, the milestone (rule) you just created — for example, "1.5 leaves per month after 1 day" — will now be visible.
This confirms that your milestone has been successfully added to the plan.
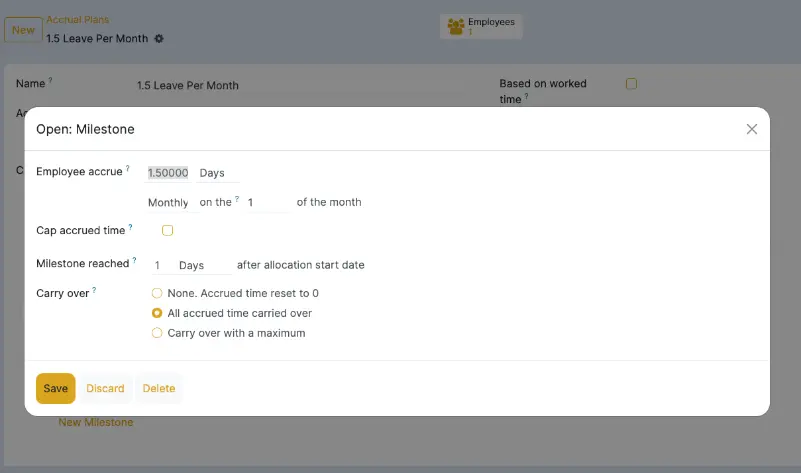
Step 6: Configure the Milestone Rule
After clicking “New Milestone”, a popup window appears where you can configure the rule for leave accrual. In this form, define how leave is accrued for employees:
- Employee accrue: Enter the number of leave days employees will receive — in this case, 1.5 days.
- Milestone reached: This defines after how many days from the allocation start date the rule will take effect. Here, it is set to 1 Day.
- Cap accrued time (optional): If enabled, you can limit the maximum number of days that can be accrued.
- Carry over: Choose how unused leave is handled at year-end or allocation period end. In this setup, “All accrued time carried over” is selected, meaning no leave is lost.
Once all the fields are filled in as per your policy, click “Save” to finalize the milestone rule.
Step 7: Save the Entire Accrual Plan
Once the rule (milestone) appears under the "Rules" section, the final step is to save the entire plan.
As shown with the red arrow in the image, click the “Save” button located at the top left corner of the screen — next to the “New” button.
This confirms and saves your complete accrual plan, including all configured rules and settings.

Step 8: Verify the Accrual Plan Entry
After clicking the “Save” button, your newly created accrual plan will be listed under the “Accrual Plans” section in EdgERP.
In the given below picture you can now see your plan — for example, “1.5 Leaves Per Month” — successfully added and visible in the list. This confirms that your configuration has been completed, and the system will now apply leave accruals automatically based on the rules you defined.

Step 9: Verify Monthly Leave Allocations in Management
After configuring the accrual plan to allow 1.5 paid leaves per month, navigated to:
Time Off → My Time → Management → Allocations

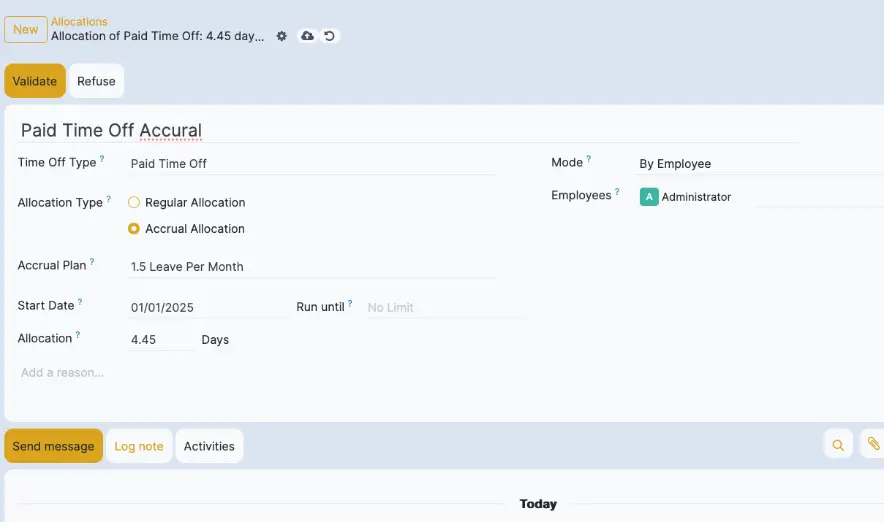
Step 9: Apply the Accrual Plan to an Employee
Click on New to create a new allocation.
Fill the allocation form with the following details:
- Time Off Type: Select Paid Time Off.
- Allocation Type: Choose Accrual Allocation.
- Accrual Plan: Select the plan you created earlier, for example, 1.5 Leaves per month.
- Start Date: Set the start date of the allocation, e.g., 01/01/2025.
- Run Until: (Optional) Define an end date if needed.
- Allocation: Enter the number of days, e.g., 1.500 Days (for first month).
- After filling in the details, click on Save.