This guide explains how to create and configure Shipping Methods in the eCommerce module of edgerp. Shipping methods allow you to offer delivery options to customers during the checkout process. You can set up fixed-price shipping, free delivery based on order value. By properly configuring shipping methods, you can enhance customer satisfaction and streamline your delivery process.
Step 1: Accessing the Shipping Methods Menu
To begin configuring shipping methods in EdgeRP, navigate to:
Website → Configuration → eCommerce → Shipping Methods
This path takes you to the shipping methods section, where you can view, edit, or create new shipping rules for your online store. Shipping methods define how products will be delivered to customers during checkout and allow you to set pricing, delivery conditions, and availability zones.

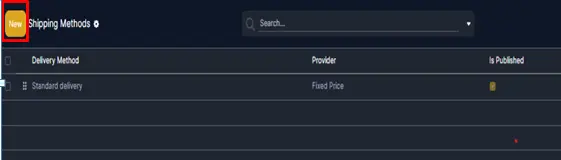
Step 2: Opening the Shipping Methods Panel
Once you click on “Shipping Methods” from the configuration panel, the system will display a list of existing shipping methods in the main view.
To add a new shipping method, click the “New” button located at the top-right corner. This button will open a blank form that allows you to define a new shipping rule with all its settings.
Step 3: Creating a New Shipping Method
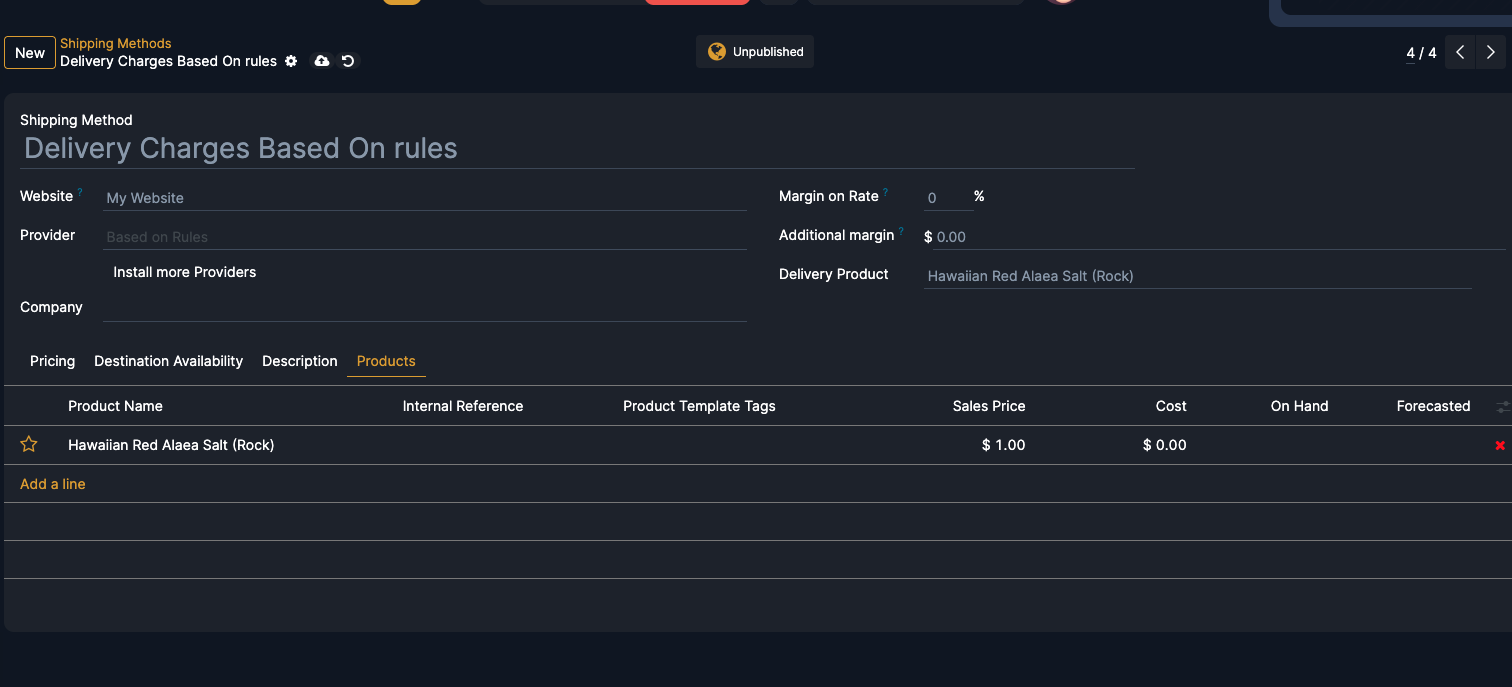
After clicking on “New”, a form will appear where you can configure the shipping option. This form includes several important fields and settings that determine how the shipping method behaves during checkout.
In this form, you will see several fields and options to configure:
Shipping Method Name:
Enter a clear and recognizable name. In the example above, it is "Delivery Charges Based on Rules".
Shipping Method Type:
Select the type of shipping. In this case,
it is a “Delivery Method” used in eCommerce checkout.
Provider:
Set the provider to “Based on Rules” to define shipping charges using specific conditions (like weight, volume, price, etc.
If no providers are visible, Click on "Install More Providers".
Margin on Rate & Additional Margin:
These are optional and can be left blank or set to 0% unless required by your pricing strategy.
Delivery Product:
Choose a product to represent the shipping charge (e.g., “Hawaiian Red Alaea Salt (Rock)” as shown in the image).
If this dropdown is empty, ensure that the Delivery module is installed from the Apps menu.
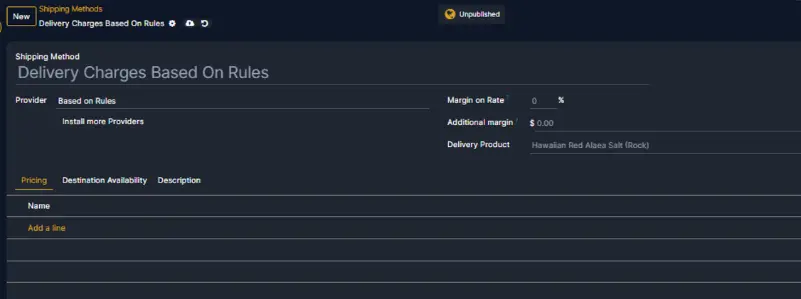
Step 4: Define Shipping Price Rules Using the Pricing Tab
Once you have filled in the basic details of the shipping method, navigate to the “Pricing” tab located just below the form (as highlighted in the previous image).
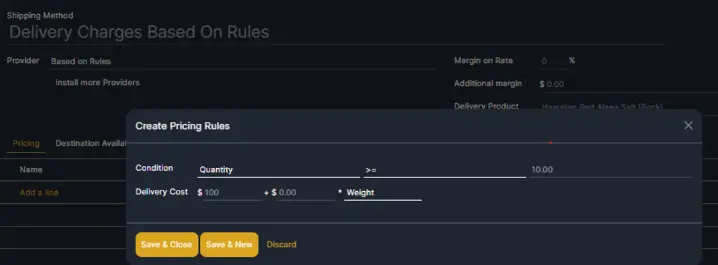
Click on “Add a line” under this tab. As shown in the image below, a popup window titled “Create Pricing Rules” will appear.
In this popup, you need to configure the shipping rule:
Condition:
Choose the basis for the rule. This can be Weight, Volume, Price, or Quantity.
In the given example, the condition is set to Weight.
Comparison Operator (>=):
This symbol is used to set a minimum threshold.
For example, ">=" means "greater than or equal to". So in this case, the rule will apply if the weight is 10.00 or more.
Value Field (e.g., 10.00):
Enter the value against the selected condition. For instance, if the condition is Weight, you may specify 10.00 kg.
Delivery Cost:
Enter the fixed cost that will be charged when this rule is triggered.
In the example above, the Delivery Cost is set to $100.
After completing the rule setup, click “Save & Close” to apply the rule.
You can add multiple pricing rules using “Save & New” if needed.
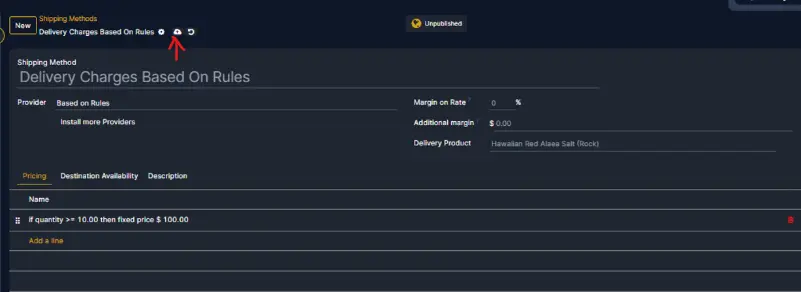
Step 5: Review the Added Pricing Rule
After entering the pricing rule details in the previous step and clicking “Save & Close”, you will be redirected back to the main shipping method form.
As shown in the image below, under the “Pricing” tab, you can now see the rule displayed in the “Name” section.
This confirms that the pricing rule has been successfully created. For example, the rule shown here indicates:
If quantity is greater than or equal to 10.00, then a fixed delivery charge of $100.00 will be applied .
This allows you to visually verify and confirm that the shipping charge logic has been correctly configured based on your input.
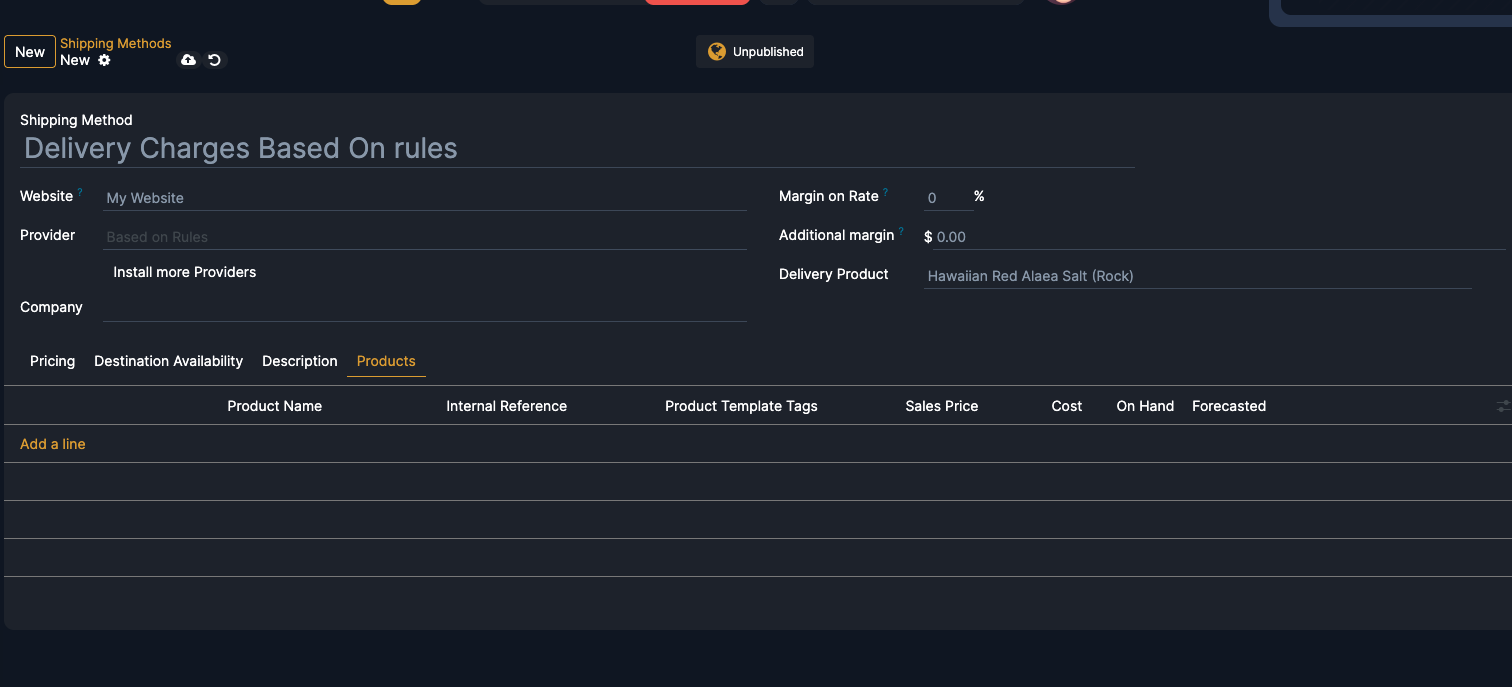
Step 6: Configuring the Products Tab
After completing the pricing rules, navigate to the “Products” tab in the shipping method form. This section allows you to link products that are associated with the shipping method—often used for reporting, cost calculation, or internal tracking purposes. Here’s a brief explanation of each field in this tab:
- Product Name: This field displays the name of the product related to the shipping method. It could be a physical product or a virtual one like a delivery charge item (e.g., “Delivery Fees”).
- Internal Reference: The internal code or SKU for the product, which helps identify it uniquely in the system.
- Product Template Tags: Tags associated with the product template for categorization or filtering purposes. These are useful in reports or product searches.
- Sales Price: The standard selling price of the product as defined in the product master.
- Cost: The cost price of the product, representing how much it costs your company to provide or procure this item.
- On Hand: Displays the current inventory level available for this product in the warehouse.
- Forecasted: Shows the projected future inventory level based on current stock, incoming shipments, and outgoing deliveries.
These fields help in tracking the actual products linked to the shipping method and can assist in internal costing, stock management, and reporting.
To add a new product line, simply click “Add a line”, select the relevant product, and fill in the details as needed.
Step 7: Configuring the Delivery Product
After adding relevant products in the “Products” tab, the next important part of configuring your shipping method is setting the Delivery Product. This step ensures that shipping charges are treated as a product or service in your sales and accounting workflows.
This section is located in the upper-right area of the form view, labeled “Delivery Product”.
What is the Delivery Product?
The Delivery Product is a product (usually of type “Service”) that represents the shipping fee on sales orders. It is automatically added as a line item when this shipping method is applied during checkout or on a sales quotation.
This product acts like a placeholder for shipping costs—making them visible, trackable, and billable.
Why is it important?
- Invoicing: Ensures that the shipping fee is included in the invoice sent to the customer.
- Accounting: Helps you keep proper financial records of shipping revenue.
- Reporting: Allows you to track how much income is generated from delivery charges.
- Automation: The delivery fee product is automatically applied to customer orders using this shipping method.
Fields Explained
- Delivery Product: Set to “Hawaiian Red Alaea Salt (Rock)” in the image. This is likely a placeholder or example item. Ideally, this should be a product named something like “Delivery Charge” or “Shipping Fee”, created specifically for this purpose.
- Margin on Rate: A percentage that can be added to the shipping cost as profit. (In the image, it’s 0%.)
- Additional Margin ($): A fixed amount added to the shipping rate. (Set as $0.00 in the screenshot.)
Best Practices:
- Use a service-type product for Delivery Product to avoid affecting inventory.
- Name it clearly, like "Standard Delivery Charge" or "Shipping Fee", to avoid confusion in orders and reports.
- Ensure the delivery product has the correct income account assigned for proper accounting.
Step 8: Complete the Configuration
After setting the pricing rules, and product details based on rules simply click on the Save button at the top of the page to save the shipping method. This completes the configuration process. Now, the delivery charges will be applied automatically based on the rules you have defined.
.
once you’ve completed all configurations and saved your shipping method, you can now click on the “Publish” button to make it live on your website.
This ensures that customers will see the shipping option during checkout, and the defined pricing rules will be applied automatically.
